
Managing a remote Linux server from a Windows machine usually forces a frustrating choice: type repetitive scp or rsync commands in PowerShell, or rely on legacy FTP that transmits credentials in plain text. WinSCP eliminates that trade-off by placing SSH-grade encryption inside a graphical, drag-and-drop file manager.
Download the official installer directly from winscp.net. Avoid third-party download hubs, which often bundle unwanted software or outdated binaries. Run the standard installer, accept the GNU General Public License, and launch the setup wizard.
During installation, WinSCP prompts you to select an interface style. Your choice shapes your everyday workflow:
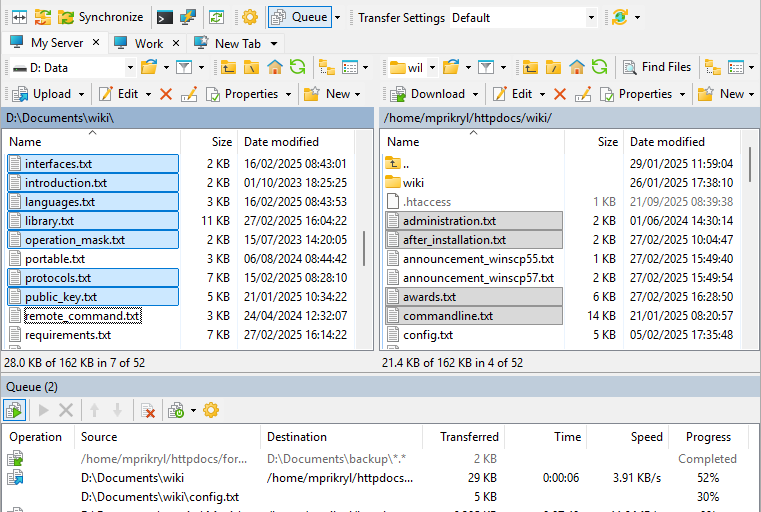
- Commander Interface (Recommended): Displays two side-by-side panels—your local Windows filesystem on the left and the remote server directory on the right. It supports classic keyboard shortcuts (such as F5 to copy and F6 to move) and gives immediate visual feedback on source and target paths.
- Explorer Interface: Uses a single-panel view similar to Windows File Explorer, featuring a navigation tree on the left and folder contents on the right. It relies on standard Windows drag-and-drop actions and context menus.
For system administration and web development, the Commander view offers superior control over multi-directory browsing and active transfer queues.
Connecting to Remote Server via SFTP
When you launch WinSCP, the Login dialog opens automatically. This screen serves as your central dashboard for managing remote server connections.
- Select the File Protocol: Choose SFTP (SSH File Transfer Protocol). SFTP routes all communication through an encrypted SSH tunnel, keeping both your passwords and transfer payloads secure. Avoid plain FTP unless operating inside an isolated, secure network environment.
- Enter Hostname and Port: Enter your server’s public IP address or domain name in the Host name field. Keep the Port number set to 22 unless your SSH daemon uses a custom port.
- Provide Credentials: Enter your remote username (such as ubuntu, root, or a dedicated account). You can enter a password now, but leaving this field empty is recommended if you plan to use key-based authentication.
Click Login. If this is your first connection to the server, WinSCP halts with an Unknown Host Key warning. This safeguards your session against man-in-the-middle (MITM) attacks.
Security Verification: Match the SHA-256 fingerprint shown in the WinSCP alert against the host fingerprint on your server (run ssh-keygen -l -f /etc/ssh/ssh_host_ed25519_key.pub on the server console). Once verified, click Accept. WinSCP stores this key in the Windows registry and will warn you if the server key changes in the future.
To save your connection settings, click Save in the Login window. Use a clear naming convention like prod-web-app-01 or staging-api-server. WinSCP lets you group saved profiles into folders, keeping extensive server infrastructure organized.
Configuring Passwordless SSH Key Authentication
Authenticating with SSH keys protects your server against brute-force password attacks and streamlines your login flow. WinSCP uses PuTTY’s native private key format (.ppk).
If your cloud host provided an OpenSSH private key (such as a .pem or id_rsa file), convert it to .ppk using PuTTYgen:
- Open PuTTYgen (included with the standard WinSCP installer).
- Click Load, set the file filter to All Files (*.*), and open your .pem or OpenSSH key.
- Once imported, optionally enter a passphrase to protect the key locally, then click Save private key to create the .ppk file.
To attach the key to your saved session:
- In the WinSCP Login dialog, select your site profile and click Edit.
- Click Advanced… under the login fields.
- In the left sidebar, expand SSH and select Authentication.
- Under Authentication parameters, click the browse button (…) next to Private key file and choose your .ppk key.
- Click OK, then click Save on the main login screen.
Click Login to authenticate instantly using key cryptography without entering a password.
Navigating, Transferring, and Managing Server Files
In the Commander view, your local filesystem appears on the left and your remote home directory on the right. Managing files across environments requires only a few inputs:
- Basic Transfers: Highlight items and press F5 to copy or F6 to move them between panels. You can also drag files directly across the split pane.
- Queue Processing: For large file sets or heavy directory structures, drag items into the bottom transfer queue. WinSCP processes the batch in the background, keeping the main windows responsive.
- Direct In-Place Editing: Press F4 or double-click a remote configuration file (such as nginx.conf) to open it in WinSCP’s built-in text editor. Saving changes with Ctrl+S automatically uploads the revised file over SFTP. You can assign external editors like Notepad++ or Visual Studio Code under Preferences > Editors.
To modify Linux permissions without opening a terminal shell, select a remote item and press F9 (or right-click and choose Properties). Adjust the permission checkboxes or type the numeric octal value directly (such as 0755 or 0644). You can apply changes recursively across nested subdirectories before clicking OK.
Automating Transfers and Syncing Directories
WinSCP offers advanced tools to automate routine file transfers and keep environments synchronized.
Live Directory Mirroring
Manually re-uploading modified files during active development slows down your workflow. WinSCP features a live monitoring tool called Keep Remote Directory Up To Date. Open the target local and remote folders, then select Commands > Keep Remote Directory Up To Date… (or press Ctrl+U).
Configure your synchronization preferences (such as automatically deleting removed files) and click Start. WinSCP tracks local file changes and pushes updates to the server instantly whenever you save in your local code editor.
Background Transfers
Transferring large database backups or system archives can block normal window navigation. In any transfer prompt, select Transfer in background (add to transfer queue). WinSCP hands off the operation to a background process so you can continue browsing, editing, and managing files uninterrupted.
Exporting to Automation Scripts
To run scheduled file transfers using Windows Task Scheduler or CI/CD pipelines, export your session parameters directly into script code:
- Select your site in the Login window.
- Click Manage at the bottom of the list and choose Generate Session URL/Code.
- Select the Script or .NET Assembly tab. WinSCP generates production-ready code with your exact connection settings, key fingerprints, and transfer commands.
Execute the script via a simple batch script using winscp.com /script=backup.txt to build reliable, encrypted automation pipelines between Windows and remote servers.