A Windows boot failure can come from a damaged update, incompatible driver, corrupted system files, failing hardware, or broken startup configuration. The safest approach is to identify where startup stops, protect your data, and try repairs from least disruptive to most disruptive.
This guide covers Windows 11 and Windows 10. Recovery menu names vary slightly by version and manufacturer, but the troubleshooting sequence is broadly the same.
Recognize the kind of startup failure
- No power or no display: No manufacturer logo appears. Start with power, monitor, and hardware checks—not Windows repair commands.
- “No bootable device” or “Operating system not found”: The firmware cannot locate a usable boot target. Suspect drive detection, boot order, or startup configuration.
- Blue screen or repeated restart: Windows starts loading but encounters a critical error. Drivers, updates, memory, storage, and system corruption are common causes.
- Automatic Repair loop: Windows detects repeated unsuccessful starts, but its automatic recovery cannot resolve the underlying problem.
- Black screen after signing in: Windows may already be running. Display drivers, startup applications, or the desktop process may be responsible.
Know when to stop
Stop repair attempts if a drive clicks, repeatedly disconnects, disappears from firmware, or produces persistent read errors. Repeated scans and restarts can reduce your chances of recovering files from failing storage. If the data is irreplaceable, consider professional recovery before further testing.
Before making changes, disconnect unnecessary USB devices, external drives, docks, and memory cards. Leave the keyboard, mouse, and display connected. Keep a laptop connected to reliable power.
If Windows still starts occasionally, back up important files immediately. If it does not, use recovery tools or another computer to copy accessible files before attempting repairs that write to the disk.
Find your BitLocker recovery key
Windows recovery tools may request a 48-digit BitLocker recovery key, including on PCs using automatic device encryption. Check your Microsoft account, saved printouts, USB backups, or your organization’s IT department. Match the displayed key ID to the correct key.
A Windows sign-in password is not a substitute. Avoid changing firmware security settings, clearing the TPM, or switching storage modes while troubleshooting: these changes can trigger recovery prompts or create new boot problems.
Record the stop code and recent changes
Photograph the blue screen or write down its stop code and any named file. Then note what changed immediately before the failure: a Windows update, graphics driver, new SSD, RAM upgrade, firmware update, power interruption, or unexpected shutdown.
A stop code is a clue, not a diagnosis. Different faults can produce the same code, and a named driver may be the victim of corruption rather than its source.
- INACCESSIBLE_BOOT_DEVICE: Windows cannot access its boot storage. Check recent storage-driver changes, firmware storage settings, and drive health.
- CRITICAL_PROCESS_DIED: An essential process stopped. Possible causes include damaged Windows files, driver problems, or storage errors.
- MEMORY_MANAGEMENT or PAGE_FAULT_IN_NONPAGED_AREA: Investigate RAM, drivers, unstable overclocking, and corruption.
- IRQL_NOT_LESS_OR_EQUAL: Often involves a driver or invalid memory access; RAM instability is another possibility.
- WHEA_UNCORRECTABLE_ERROR: Windows received a hardware error report. Check temperatures, firmware, power, processor stability, memory, and storage.
Use the failure pattern
If the PC crashes before the sign-in screen, focus on startup drivers, storage, updates, and system files. If it boots in Safe Mode but not normally, a driver, service, or startup application becomes more likely.
If crashes also occur while booting a Windows installer or hardware diagnostic, installed Windows software is less likely to be the sole cause. Random stop codes, freezes, and corrupted files together can indicate unstable RAM or failing storage.
Collect evidence when Windows is accessible
Search for Reliability Monitor to see a timeline of failures and installations. Event Viewer can provide supporting details, but a Kernel-Power event generally records an improper shutdown—it does not identify the original cause.
Crash dumps may be stored in C:\Windows\Minidump or C:\Windows\MEMORY.DMP. Microsoft’s WinDbg can analyze them. Look for patterns across several dumps rather than treating one “probably caused by” result as definitive.
Memory dumps can contain sensitive information. Share them only with trusted support providers.
Use the least disruptive recovery route
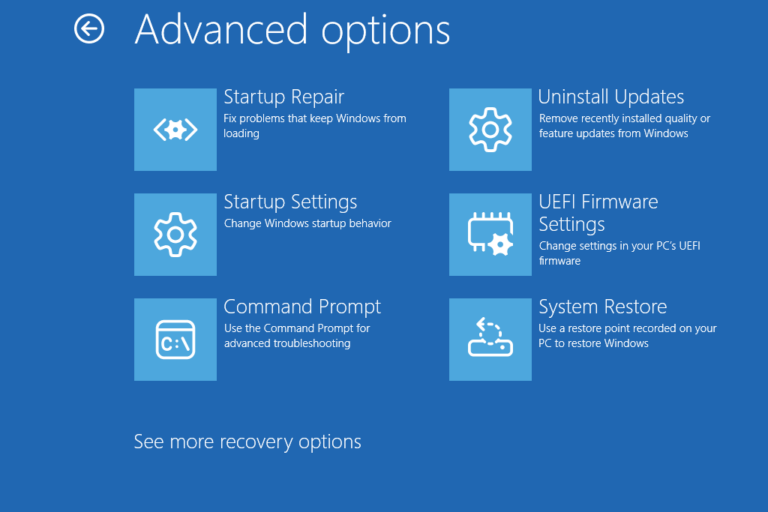
Windows Recovery Environment, usually called WinRE, provides Startup Repair, Safe Mode access, update removal, System Restore, and Command Prompt.
- From working Windows: Open Settings, find Recovery, and choose Advanced startup. Alternatively, hold Shift while selecting Restart.
- From the sign-in screen: Hold Shift, open the power menu, and select Restart.
- After repeated failed starts: Windows may open Automatic Repair. Choose Advanced options.
- From installation media: Boot a Windows installation USB and select Repair your computer, not the installation option.
If no other route works, interrupting startup twice can cause Windows to offer recovery on the next boot. Use this only as a last resort, during ordinary Windows loading—not during an update, firmware flash, reset, or disk operation.
Create and boot a recovery USB
On another working PC, use Microsoft’s official Windows download tools to create installation media. The USB drive will be erased, so copy anything important off it first.
Use the affected computer’s one-time boot menu to select the USB. The key varies by manufacturer; common choices include F12, Esc, and F9. Match the existing firmware mode, normally UEFI on modern PCs.
If official media will not boot, check the manufacturer’s instructions before disabling security features. Changing Secure Boot or switching between UEFI and legacy modes is not a routine first-line repair.
Try Startup Repair once
Choose Troubleshoot → Advanced options → Startup Repair. It can repair some damaged startup files and configuration problems, but it cannot fix failed hardware or every driver issue.
If it reports that it could not repair the PC, move on rather than repeatedly running it. Its log is normally under the Windows installation’s Windows\System32\LogFiles\Srt folder, although the drive letter may differ in recovery.
Start with minimal drivers
In WinRE, select Troubleshoot → Advanced options → Startup Settings → Restart, then choose Safe Mode. Try ordinary Safe Mode first; use Safe Mode with Networking only if you need network access.
Be prepared to use your account password rather than a PIN. Safe Mode networking does not guarantee that Wi-Fi will work.
A successful Safe Mode boot suggests that Windows can load its basic components. It does not prove the hardware is healthy, but it gives you a useful repair environment.
Undo the most likely driver change
If the problem began after a driver update, open Device Manager, locate the device, open Properties, and check the Driver tab for Roll Back Driver. If rollback is unavailable, uninstalling the affected driver and reinstalling a known-good version may help.
Use drivers from the PC manufacturer or the hardware vendor. Avoid generic “driver updater” utilities. For laptops, manufacturer-provided graphics and chipset packages may include model-specific requirements.
Do not casually remove storage-controller drivers. An incorrect change can prevent Windows from accessing its system drive. Storage-related crashes deserve model-specific guidance.
Test startup applications and services
If a driver is not the obvious cause, disable nonessential startup applications in Task Manager. For a clean boot, use System Configuration, hide Microsoft services, and disable the remaining third-party services temporarily.
If normal startup then works, re-enable items in small groups until the failure returns. Keep a record so you can restore the original configuration.
Safe Mode and clean boot are different tests: Safe Mode limits drivers and services, while a clean boot mainly isolates third-party services and startup software.
Remove the relevant Windows update
From WinRE, open Advanced options → Uninstall Updates. If the failure followed a routine monthly update, try uninstalling the latest quality update.
If it followed a major Windows version upgrade, the feature-update removal option may be more appropriate. Availability depends on retained rollback files and the upgrade’s recovery window.
Remove one update, test startup, and record the result. Once the PC works, investigate the compatibility issue before reinstalling the same update; do not leave security updates paused indefinitely.
Use System Restore
System Restore returns system files, registry settings, drivers, and installed programs to an earlier restore point. It is designed to leave personal documents intact, but it is not a backup.
Choose a restore point from before the first failure and review affected programs when that option is available. Applications installed afterward may need reinstalling.
If no restore points exist, this route is unavailable. Also, avoid randomly deleting update folders or registry entries: targeted rollback is safer and easier to evaluate.
Identify the Windows drive in recovery
In WinRE, the installed Windows partition is not necessarily C:. The X: drive usually belongs to the recovery environment.
Open Command Prompt and run these commands separately:
diskpart
list volume
exit
Inspect likely volumes with commands such as dir C:\Windows and dir D:\Windows. Confirm the expected Users and Program Files folders too.
The examples below use W: for the confirmed Windows partition. Replace W: with its actual letter. If the volume is BitLocker-locked, unlock it before attempting repairs. Do not format a volume because recovery cannot read it.
Use DISM and SFC when Windows can start
In normal Windows, open Terminal or Command Prompt as administrator. Run:
DISM /Online /Cleanup-Image /RestoreHealth
Then run:
sfc /scannow
DISM repairs the component store that Windows uses for servicing and repairs. SFC checks protected system files and replaces damaged copies when possible. Let each operation finish, then restart and test.
If DISM cannot obtain repair files, it may require a compatible installation source. Match the Windows version, edition, language, and architecture; an arbitrary Windows ISO is not always suitable.
Understand offline repair limits
In WinRE, /Online targets the currently running recovery environment, not the installed Windows system. Offline repairs require an explicit installation path.
A typical offline SFC command, when W: is the appropriate offline boot and Windows volume, is:
sfc /scannow /offbootdir=W:\ /offwindir=W:\Windows
Some partition layouts require a different boot-directory path. If SFC rejects the command or cannot perform the operation, confirm the layout rather than repeatedly changing letters.
Offline DISM uses /Image:W:\ instead of /Online. Component repair may also require a matching source and the correct image index. If these details are unclear, seek assistance rather than copying a command intended for another installation.
Use CHKDSK cautiously
CHKDSK checks file-system consistency; it is not a comprehensive hardware-health test. With W: correctly identified, an initial check is:
chkdsk W:
If it reports file-system errors and important files are backed up, chkdsk W: /f attempts repairs. On an active Windows volume, Windows may schedule the check for the next restart.
Do not automatically add /r. It performs an extensive scan for unreadable sectors and attempts to recover readable data. It can take a long time and stress a failing drive. Back up or image suspect storage before repair scans; recovered file-system consistency does not make failing hardware trustworthy.
Check firmware detection and boot order first
For “no bootable device” errors, enter firmware setup and check whether the internal drive is detected. If it is missing, boot-file repair commands cannot solve the underlying detection problem.
If the drive is present, check that Windows Boot Manager is selected for a normal UEFI Windows installation. Remove external boot media and undo only clearly identified accidental changes.
A change from RAID or Intel RST to AHCI—or the reverse—can trigger INACCESSIBLE_BOOT_DEVICE. Restore the known previous setting rather than experimenting.
Understand UEFI and legacy boot differences
Modern Windows PCs generally use UEFI firmware, GPT partitioning, and a small FAT32 EFI System Partition. Older systems may use legacy BIOS and MBR.
This distinction determines the repair method. Commands such as bootrec /fixmbr address legacy boot structures and are not a universal solution for modern UEFI systems. Likewise, bootrec /fixboot can return “Access is denied”; that alone does not prove a partition needs formatting.
Rebuild UEFI boot files carefully
BCDBoot can recreate Windows boot files when the Windows installation and EFI partition remain intact. Before using it, confirm the correct Windows volume and the actual EFI System Partition on the intended system disk.
In DiskPart, list disk, list volume, and partition details help identify the layout. A GPT marker identifies the disk’s partition style, not the correct EFI partition. Do not select a partition merely because it is small and FAT32.
After positively identifying the EFI volume, select it and assign an unused letter, such as S:. Exit DiskPart. With Windows confirmed at W:, a UEFI repair command is:
bcdboot W:\Windows /s S: /f UEFI
This copies boot files to the specified EFI partition. Using /s does not create a new firmware NVRAM boot entry, so a missing Windows Boot Manager entry may require additional, system-specific repair.
Do not format, delete, or recreate partitions as a routine fix. Multiple disks, dual-boot setups, and missing EFI partitions warrant expert help because selecting the wrong target can disrupt another operating system.
Test memory and remove instability
Disable CPU or GPU overclocking and memory tuning such as XMP or EXPO while diagnosing crashes. Record existing settings first; avoid loading firmware defaults blindly, since defaults may also change storage settings.
Run Windows Memory Diagnostic if accessible, or a reputable bootable memory test. Multiple passes improve the chance of finding intermittent faults, though a clean test does not rule out every problem.
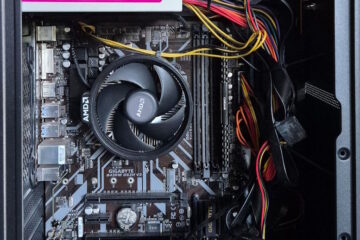
Any memory-test error matters. Possible causes include a DIMM, slot, memory controller, or unstable settings. If comfortable working inside the PC, follow its service manual to test modules individually. Power down and disconnect power first.
Check storage, cooling, and connections
Use the drive manufacturer’s diagnostic tools when available. SMART or NVMe health warnings, repeated read failures, or disappearing drives justify immediate backup and likely replacement. A “healthy” status is not a guarantee.
Check fans, blocked vents, excessive temperatures, and loose connections. Desktop storage cables can be reseated or replaced if you can do so safely. Avoid opening unfamiliar laptops or power supplies.
Firmware updates sometimes fix stability problems, but flashing firmware on an unstable PC carries risk. Follow the manufacturer’s exact procedure and ensure reliable power.
Choose the least destructive recovery option
If Windows starts but remains damaged, an in-place repair installation may preserve applications and files. It normally requires launching compatible Windows setup from within running Windows; booting the installer USB is not the same procedure.
Reset this PC → Keep my files reinstalls Windows while retaining personal files, but removes applications and resets settings. It is not a substitute for a verified backup.
A clean installation is the most disruptive option. Copy files first, verify encryption-key access, and confirm the target disk before deleting partitions. Disconnect unrelated storage when practical to reduce mistakes.
If a fresh installation crashes before adding applications or drivers, revisit hardware and firmware rather than repeatedly reinstalling Windows.
Conlusion
Fixing Windows boot errors can seem intimidating, especially when your PC refuses to start or gets stuck on the loading screen, but most startup problems can be resolved with the right troubleshooting approach. From using Startup Repair and Safe Mode to repairing corrupted system files, rebuilding boot configuration data, and checking for disk errors, Windows provides several tools to help restore normal operation. The key is to identify the underlying cause and apply the appropriate fix while protecting your personal files and system data. Always try the least invasive solutions first, back up important data whenever possible, and exercise caution when running advanced commands or modifying boot settings. With the steps outlined in this guide, you’ll be better prepared to diagnose common Windows boot errors, recover your system, and get your PC running again without unnecessary stress or a complete reinstall.